
Add a New User
- Adding a new user can be done manually by entering all of the new user's information (not all of the values are required like domain or email) or using the Active Directory Lookup Tool.
- Once the user information is filled out, select and set their
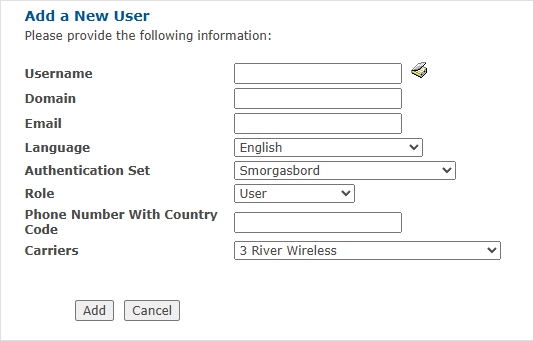
- The "Phone Number..." and "Carriers" boxes do not appear unless you are assigning an Authentication Set that contains the OTP method.
- When inputting a phone number, be sure to only use numbers or dashes (-).
ex. 1-981-867-5309 or 19818675309
"Role" defines the user's level of capabilities and permission within the Admin Portal. Admin Portal roles do not affect day-to-day authentications on MFA clients.
For a custom role or modifying one of the default roles, see our Create A Custom Role article.
Bulk Import Users
Bulk Import Users enables administrators to import multiple users simultaneously using a .CSV file or by selecting a directory service OU or group via the Active Directory Lookup Tool.
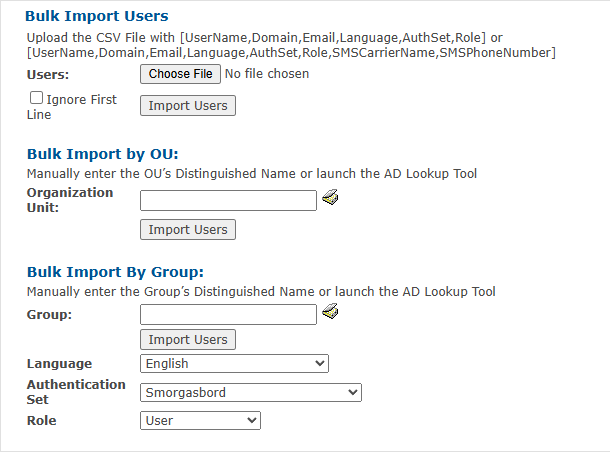
Import From .CSV
The .CSV format is as follows:
Username,Domain,Email,Language,AuthSet,Role
The values smscarriername and smsphonenumber are optional. Should they be included, the .CSV format would look the same but with these options at the end:
Username,Domain,Email,Language,AuthSet,Role,smscarriername,smsphonenumber
If a record field does not contain a value, that record can be imported without having to include a delimited space.
Example:
TestUser2,companyName,,Deutsch [German],ContactlessOnly,Admin
The record does not contain an email address. While the email is not present, the commas indicating the field are.
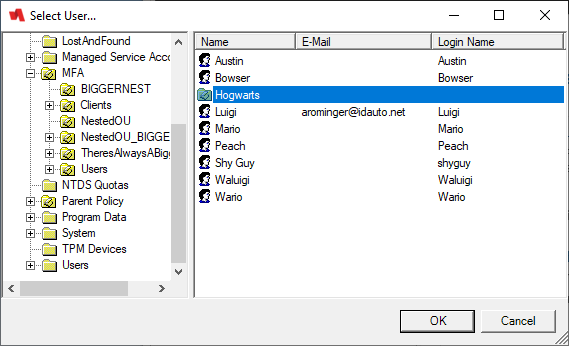
Import By AD Lookup Tool
-
Click the AD Lookup Tool button.
-
Find and select your Organizational Unit you wish to import and click "OK".
 Imports Are Immediate
When using the AD Lookup Tool for "Import by OU" or "Import by Group". When importing "by Group", be sure to set your Authentication Set and Role before selecting the group from the tool.
- The import will complete immediately and provide a success message.
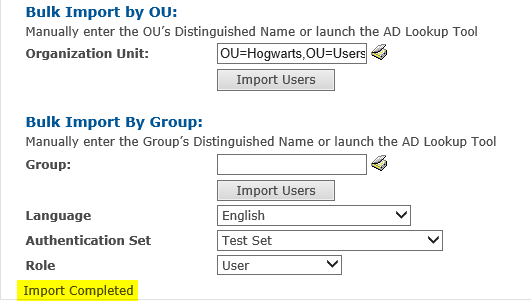
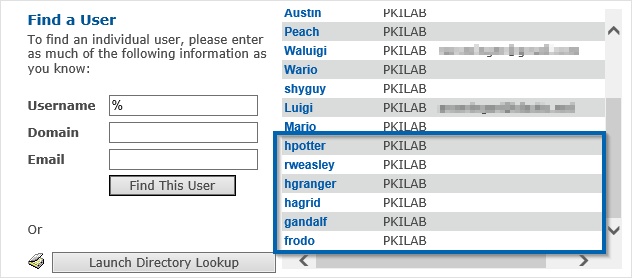
You can verify the upload(s) by looking up a user(s) in the User Lookup page.
Bulk Migrate
Bulk Migrate is our solution to not having a built-in way to update user information in mass through the web portal. This is done through a combination of SQL reporting and .CSV file uploads. More can be found on the process in our Bulk Migrate article.
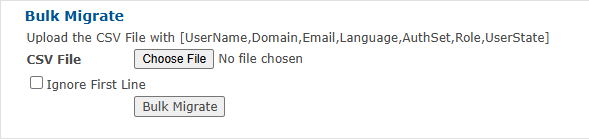
Bulk Migrate is for pre-existing users only. If their MFA account does not previously exist in the system, Bulk Migrate will not add or modify their user.
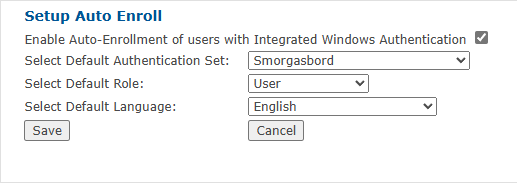
Setup Auto Enroll
This page controls the default authentication set, user role, and language.
Auto Enroll is for any domain user attempting to access the RapidIdentity MFA Server without being previously set up by an admin (see the Add a New User section). When they enter their user information, their MFA account will automatically be enrolled with the default values set on this page.
Troubleshooting
- If you are receiving an error when clicking the Active Directory Lookup Tool button, please see our ActiveX Settings For Internet Explorer and IE Compatibility Mode for Edge articles.
- If a user enrollment, manually or auto enroll, is failing, be sure you are not out of user licenses or there is not already an existing MFA user with that username.